Watches
WATCH INSTRUCTIONS & LIFETIME LIMITED WARRANTY
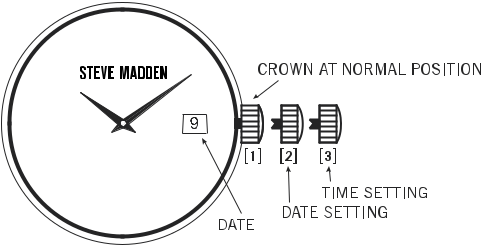
SETTING THE TIME
Pull out Crown all the way until it stops (position '3’). The second hand will stop.
Rotate the Crown in either direction until desired time is obtained. Push Crown back in all the way (position ‘1’) to re-engage time keeping. Second hand will begin to move.
NOTE: Never pull the Crown when the watch is wet.
SETTING THE TIME, DAY AND DATE
If your watch has a Date or a Day and Date Window, pull the Crown out to position ‘2’ and turn the Crown in both directions until the Date showing is the day before the desired Date. Pull out Crown all the way (position ‘3’) and turn the Crown to advance time. When midnight is reached, the Date will advance to the desired Date. Continue to turn the Crown until desired time is obtained. Push the Crown back in all the way until it stops (position ‘1’) to re-engage time keeping.
FEATURES
- Time Telling Mode (Hours, Minutes, Seconds, Month, Date, and Day of the Week)
- (2) 24 Hour Alarms
- Hourly Chime: One ‘Beep’ sound every full Hour
- Chronograph: Hours, Minutes, Seconds, and 1/100 of a Second with Lap Operation
- Countdown Timer
- World Time
- 12/24 Hour (Military Time)
- Water Resistant as indicated on the watch
- INSTALITE - Electro Luminescent Display
SELECTING FEATURES
- Time Telling Mode displays Hours, Minutes, Seconds, Month, Date, and Day of the Week.
- From Time Telling Mode, press ‘B’ Chronograph Mode appears. Press ‘B’ five times to return to Time Telling Mode.
- From Time Telling Mode, press ‘B’ twice. Timer Mode appears. Press ‘B’ four times to return to Time Telling Mode.
- From Time Telling Mode, press ‘B’ three times. World Time Mode appears. Press ‘B’ three times to return to Time Telling Mode.
- From Time Telling Mode, press ‘B’ four times. Alarm One Mode (AL1) appears. Press ‘B’ twice to return to Time Telling Mode.
- From Time Telling Mode, press ‘B’ five times. Alarm Two Mode (AL2) appears. Press ‘B’ once to return to Time Telling Mode.
SETTING THE TIME & CALENDAR
Analog
- Pull the Crown, ‘E’, The second hand stops. Rotate the Crown in either direction until the desired time is obtained.
Push the Crown back in to re-engage the time keeping.
Digital
- From Time Telling Mode, press and hold ‘A’. Seconds flash. Press ‘C’ to zero out the Seconds.
NOTE: Zeroing out 30 or more seconds automatically adds one minute to time. - Press ‘B’ Hours flash. Press ‘C’ to advance the Hour. NOTE: Pressing and holding ‘C’ will advance digits rapidly. ‘P’ indicates ‘p.m.’ times; there is no indicator for ‘a.m.’ times.
- Press ‘B’ Minutes flash. Press ‘C’ to advance the Minutes.
- Press ‘B’ Months flash. Press ‘C’ to advance the Month.
- Press ‘B’ The Date flashes. Press ‘C’ to advance the Date.
- Press ‘B’ The Year flashes. Press ‘C’ to advance the Year.
- Press ‘B’ The 12 Hour/24 Hour (Military) Time Format flashes. Press ‘C’
to select the Time Format.
NOTE: ‘12’ indicates 12 Hour Format; ‘24’ indicates 24 Hour (Military) Time Format. - Press ‘B’ The City Code flashes. Press ‘C’ to select the desired city. Based on the set time, the Hour is automatically adjusted to display the local time in the newly selected city.
NOTE: One of 22 major cities may be selected:
(LON) London, (PAR) Paris, (CAI) Cairo, (MOW) Moscow, (DXB) Dubai, (KHI) Karachi, (DAC) Dhaka,(BKK) Bangkok, (HKG) Hong Kong, (TYO) Tokyo, (SYD) Sydney, (NOU) Noumea, ((WLG) Wellington, (PPG) Samoa, (HNL) Honolulu, (ANC) Anchorage, (LAX) Los Angeles, (DEN) Denver, (MEX) Mexico City, (NYC) New York, (CCS) Caracas,(LAX) Los Angeles, (DEN) Denver, (MEX) Mexico City, (NYC) New York, (CCS) Caracas,
and (RIO) Rio de Janeiro. - Press ‘A’ to end set sequence and return to Time Telling Mode.
EL LIGHT FEATURE
Press ‘D’ in any mode to illuminate the watch face. The backlight will remain lit for 3 seconds.
NOTE: Excessive use of the light will shorten battery life.
SETTING THE ALARMS
- From Time Telling Mode, press ‘B’ four times to enter the Alarm One Mode (AL1) or five times to enter the Alarm Two Mode (AL2).
- Press and hold ‘A’ . Alarm Hours flash. Press ‘C’ to advance the Alarm Hour.
- Press ‘B’. Alarm Minutes flash. Press ‘C’ to advance the Alarm Minutes.
- Press ‘A’ to end the Set sequence.
- Press ‘B’ to return to Time Telling Mode.
ACTIVATING THE ALARMS & THE HOURLY CHIME
- While in Alarm One Mode (AL1), press ‘C’ to activate Alarm One.
NOTE: When an Alarm is activated, the Alarm symbol appears on the display and the selected Alarm will sound at the preset Alarm Time for 20 seconds or until any button is pressed. - Press ‘C’ again to activate both Alarm One and the Hourly Chime.
NOTE: When the Hourly Chime is activated, the Hourly Chime symbol appears on the display and the Hourly Chime will sound with one “Beep” every hour on the hour. - Press ‘C’ again to deactivate Alarm One.
- Press ‘C’ again to deactivate both Alarm One and the Hourly Chime.
- Press ‘B’ to return to Time Telling Mode.
- While in Alarm Two Mode (AL2), press ‘C’ to activate or deactivate
Alarm Two. - Press ‘B’ to return to Time Telling Mode.
STOPWATCH
- From Time Telling Mode, press ‘B’ to enter the Stopwatch Mode.
- Press ‘C’ to start timing.
- Press ‘C’ again to stop timing.
- Press ‘A’ to reset to zero.
- Press ‘B’ to return to Time Telling Mode.
SPLIT TIME
- While in the Stopwatch Mode, press ‘C’ to start timing.
- Press ‘A’ to measure and display Split Times.
- Press ‘C’ to stop timing at the end of the event.
- Press ‘A’ to reveal the final Split Time.
- Press ‘A’ again to reset to zero.
- Press ‘B’ to return to Time Telling Mode.
COUNTDOWN TIMER
- From Time Telling Mode, press ‘B’ twice to enter the Countdown Timer Mode.
- Press and hold ‘A’ . The Countdown Timer Hours flash. Press ‘C’ to advance the Countdown Timer Hours.
- Press ‘B’. The Countdown Timer Minutes flash. Press ‘C’ to advance the Countdown Timer Minutes.
- When the Countdown Time is set, press ‘A’ to end the Set sequence.
- Press ‘C’ to start the Countdown Timer.
- If desired, press ‘C’ again to stop the Countdown Timer.
- Press ‘C’ to resume the Countdown Timer.
NOTE: The Countdown will continue in any mode until ‘C’ is pressed while in the Countdown Timer Mode. During the final 3 minutes of the countdown, the alarm will beep twice every 30 seconds. During the final 10 seconds of the countdown, the alarm will beep once per second. When the Timer has expired, the alarm will sound with three beeps every second for 10 seconds or until any button is pressed. If no button is pressed, the Timer will count up for 5 minutes and will beep twice every 30 seconds. After the Timer has counted up to 5 minutes, the alarm will sound three times with 3 beeps. - Press ‘C’ again to stop the Countdown Timer.
- Press ‘B’ to return to Time Telling Mode.
WORLD TIME
- From Time Telling Mode, press ‘B’ to enter the World Time
- Press ‘C’ to select the desired
- Press ‘A’ to end Set sequence and return to Time Telling
WATER RESISTANCE
If your watch is water resistant, the watch is tested to be water resistant to 3-5 atmospheres (100-165 feet).
NOTE• Over time, the gaskets of the case may become worn and reduce the n'ater resistance of tfie •afc8. a trained specialist should change ttie gaskets and tfie 0-ring each time the battery is changed. To avoid any una'anted condensation, n'atches of all specifications (n'ater resistant or not) should not be exposed to extreme temperatures such as cold or heat.
CHANGING THE BATTERY
Replace batteries when the watch becomes slow or does not operate, the readout darkens or does not appear or the backlight fails. Replace with same or equivalent.
Note: Battery change should be performed by a qualified technician who should also check the condition of the gaskets at the same time. BATTERIES ARE NOT COVERED UNDER WARRANTY.
CLASP EXTENDER INSTRUCTIONS
Select styles feature an additional clasp that may be easily placed on or taken off the watch in order to better fit the watch to your wrist if needed. This is an additional extender, may be added or taken off with NO TOOL NEEDED. Simply snap it on or off as shown below.
1. Open clasp and slide through the opening in the extender (B). 2. To secure the extender, snap in place.

SIZING BRACELET INSTRUCTIONS

Turn over the watch to look for arrows on the underside of the links, showing you which way you need to push the pin out of the link. Use a pin remover tool to push out the “Hair Clip Pin” from the hole located on the side of the link. After the links are removed, simply follow these steps in reverse to re-assemble the bracelet.
SECURITY CLASP BAND ADJUSTMENT INSTRUCTIONS

1. Slide the clasp up or down the mesh strap to adjust the band for the size of your wrist. When the proper fit for your wrist has been obtained, align the back of the clasp with the corresponding groove in the mesh watch strap.
2. Press the slotted clasp back down to securely close it.
BAND ADJUSTMENT INSTRUCTIONS
CHANGING THE STRAPS
To remove the Strap, place the watch face down on a soft, flat surface. Slide
the Strap Lever to the left and pull the Strap away from the watch.
TO INSERT THE NEW STRAP
Set Strap Pin into the Left Pin Groove. Slide the Strap Lever to the left.
Align the Strap so the Right Pin “clicks” into the Right Pin Groove when the
Lever is released.

Dear Customer:
Help your watch/jewelry retailer protect our environment by properly recycling the button cell battery in your watch. Professional jewelers and watch retailers are best equipped to replace the battery in your watch without damage to the watch case and movement inside. They have the specialized tools and experience to do the job right. Inexperienced people can scar the case and
damage the water resistant seal — voiding your warranty. It is important to recycle your watch battery in an environmentally safe way. Your professional watch/jewelry retailer is the best person to do this for you. These professionals collect used batteries and recycle them through licensed waste management companies.
Do our environment and your watch a favor. Ask your watch/jewelry professional to replace your battery when it expires.
USE OUR NATIONWIDE SERVICE CENTERS.
YOU CANNOT RETURN WATCH FOR SERVICE WHERE IT WAS PURCHASED.
If your watch requires cleaning, lubrication, battery changing, or needs a crystal replaced, Steve Madden Watch approved Service Centers are available in your area. These repair facilities use Steve Madden Watch parts and components to assure quality and future performance. Free estimates are available in advance, should you need servicing or repairs not covered under the warranty. Repairs covered
under the warranty may require proof of purchase, so retain the purchase receipt.
TO RETURN YOUR WATCH FOR SERVICING:
Please call (866) 631-0342 or email servicedept@egluck.com for a listing of all approved and authorized stations and locations.
NOTE: YOUR WATCH CANNOT BE RETURNED TO THE PLACE OF PURCHASE.
Carefully pack your watch in a sturdy box (do not send in a gift box for same will not be returned) and mail to the nearest approved authorized service station.
Because of possible loss, we recommend that you insure your watch, return receipt requested, when using the mail. If you do not receive a receipt within a reasonable time, start a tracer through the originating post office. Never include a special watch band or any other article of personal value in your shipment.
LIMITED WARRANTY
This STEVE MADDEN Watch is warranted to you, the owner, for your lifetime against all defects in material or workmanship. This warranty does not apply to normal wear and tear or abuse and excludes batteries, case, strap, crystal, or bracelet. In the event of a defect or malfunction of the movement within this period it will be repaired or replaced, at our option, provided that it is returned prepaid with a check or money order for $9.95 to cover the cost of handling and return postage. (This is not a repair charge.) DO NOT SEND CASH. No additional charge will be made unless additional servicing is necessary for reasons beyond our control such as accident, misuse,neglect or replacement of parts not warranted is required such as case, crystal,strap, bracelet or batteries in which event a moderate charge will be made. The movement of any timepiece requires periodic cleaning/timing which is not a defect and, as such not warranted. After one year from the date of purchase each cleaning/timing will be performed as required without charging a fee in excess of the specified $9.95 handling charge. The above remedy is exclusive. STEVE MADDEN shall not be liable for any incidental or consequential damages. Should any other part of your watch require repair, please use our Service Center for quick and inexpensive repairs on your watch. This warranty gives you specific legal rights and you may also have other rights which may vary from state to state. Some states do not allow limitations on how long an implies warranty lasts, or the exclusion or limitation of incidental or consequential damages, so the above limitation and exclusions may not apply to you. In the event of a problem with warranty service or performance, you may be able to go to Small Claims Court, a State Court or a Federal Court.
*SPECIFICATIONS SUBJECT TO CHANGE WITHOUT PRIOR NOTICE FOR PRODCT IMPROVEMENT, DESIGN MAY VARY DEPENDING ON THE MODEL.
